 Save
Save My neighbor brought over a jar of homemade guava paste one afternoon, and I remember standing in her kitchen watching her slice it like she was revealing something precious. The paste gleamed amber in the sunlight, and she paired it with sharp Manchego cheese and a few crackers. One bite changed how I thought about what a simple fruit could become with patience and heat. I made my first batch that week, filling my kitchen with the most intoxicating tropical fragrance.
I brought a batch to a work potluck tucked inside homemade thumbprint cookies, and watching people's faces light up as they tasted that bright guava center was worth every minute of stirring. My coworker asked for the recipe right there, fork still in hand, and I realized this wasn't just a condiment anymore—it was something I'd be making for people I cared about.
Ingredients
- Ripe guavas (1 kg / 2.2 lbs): The backbone of this paste, and their ripeness matters more than you'd think—look for fruit that yields slightly to pressure and smells fragrant, almost floral.
- Granulated sugar (450 g / 2 1/4 cups): This isn't just sweetness; it's the preservative that lets your paste keep for months and helps it set to that perfect jammy texture.
- Fresh lemon juice (2 tbsp): A small splash that brightens the deep guava flavor and balances the sweetness so it doesn't feel cloying.
- Water (120 ml / 1/2 cup): Just enough to help the guavas soften without diluting their concentrated flavor.
Tired of Takeout? 🥡
Get 10 meals you can make faster than delivery arrives. Seriously.
One email. No spam. Unsubscribe anytime.
Instructions
- Prepare your fruit:
- Wash the guavas under cool water, trim away the hard ends, and quarter them. If you encounter seeds while cutting, you can remove them now for an extra smooth paste, though leaving them is fine too.
- Soften the guavas:
- Pour the water into a large saucepan, add your guava quarters, and bring everything to a boil over medium heat. Once it's bubbling, cover and reduce to a gentle simmer for 15 to 20 minutes until the fruit feels completely tender when poked.
- Puree and strain:
- Remove from heat and let it cool just enough to handle. Press the cooked guavas through a food mill or fine mesh strainer, pushing the soft flesh through while leaving seeds and skin behind. This step determines your paste's texture, so take your time.
- Calculate and combine:
- Measure your strained puree and add sugar at a ratio of about one cup sugar per cup of puree. Stir in the lemon juice once you've added the sugar.
- The long, gentle cook:
- Return everything to the pot and set the heat to low. This is where patience becomes your ingredient—stir constantly with a wooden spoon for 40 to 50 minutes. The mixture will gradually darken and thicken, pulling away from the sides of the pan as moisture evaporates.
- Test for doneness:
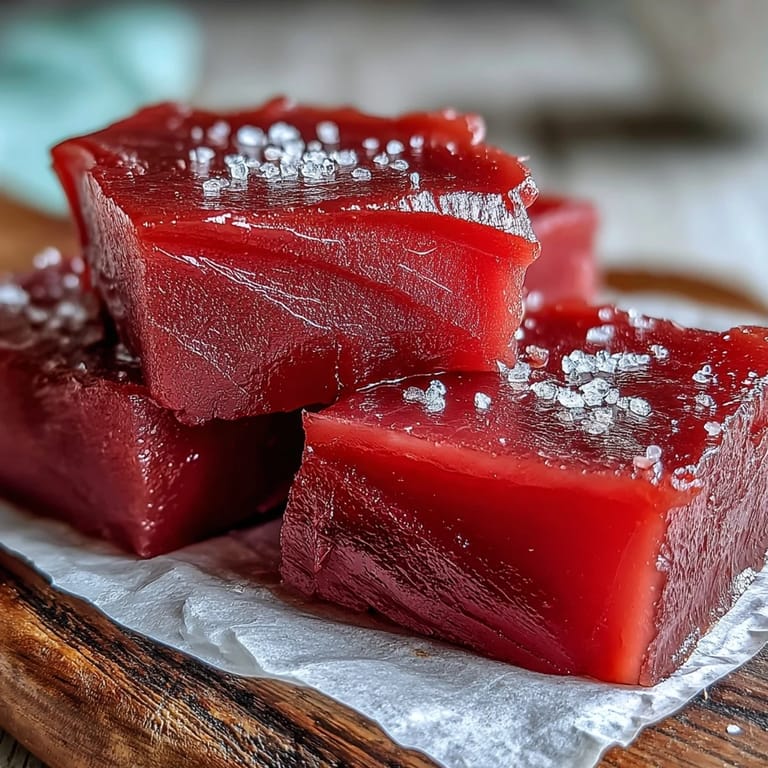
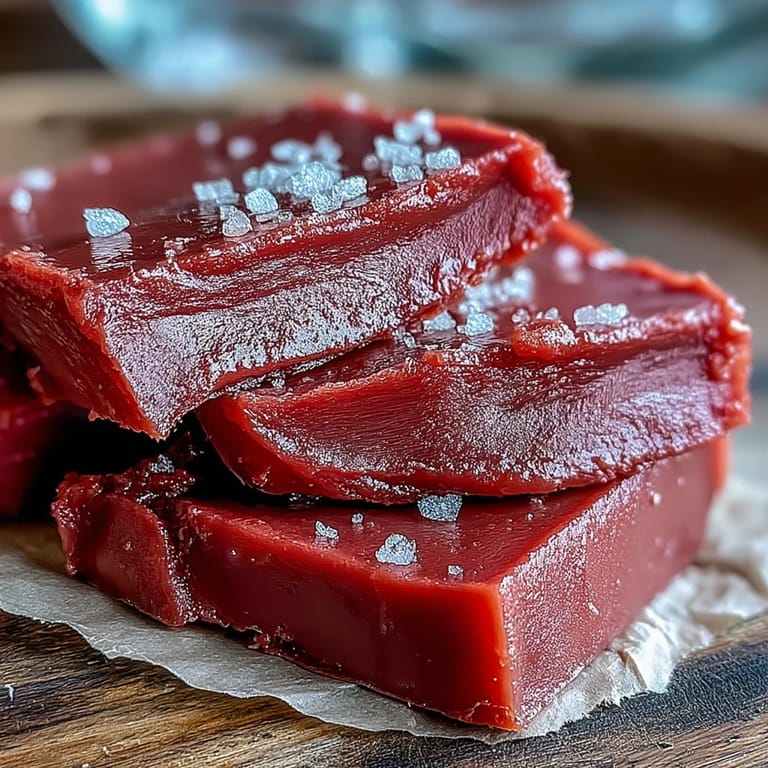
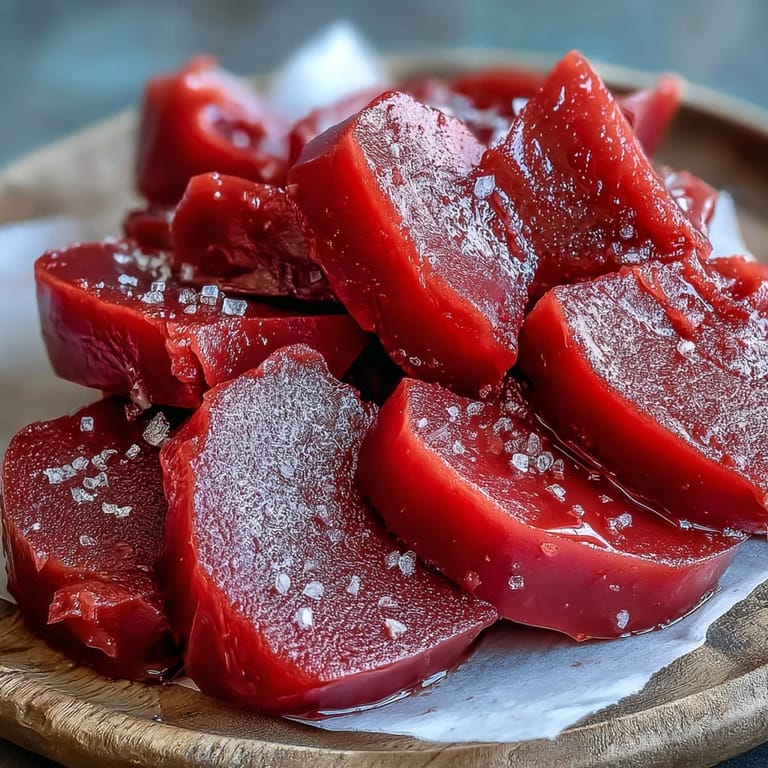
- Drop a small spoonful onto a plate and let it cool for a minute. If it holds its shape and doesn't run, you're done. The paste should be glossy, deep amber, and smell almost caramelized.
- Set and cool:
- Line a loaf pan or small baking dish with parchment paper and pour in your finished paste, smoothing the top with a spatula. Leave it undisturbed at room temperature for 2 to 3 hours until completely firm.
 Save
Save My daughter once asked why something so beautiful had to sit for hours before we could eat it, and I realized that waiting was part of the magic. When we finally unmolded it and sliced into those jewel-toned squares, she understood—some things are worth the patience.
Pairing Ideas That Actually Work
This paste has a gift for making other things taste better. Manchego cheese and a few crackers is the classic, but I've also tucked it into palmiers, swirled it into vanilla yogurt, and spread it on buttered toast with a pinch of sea salt. The tartness of a sharp cheese or the butter in pastry dough both play beautifully against the paste's concentrated sweetness, creating a balance that feels both simple and sophisticated.
Storage and Keeping
Once cooled and unmolded, your guava paste keeps well in an airtight container in the refrigerator for up to three months, though mine rarely lasts that long. You can also freeze it for longer storage, sliced into portions so you can thaw just what you need. The texture stays perfect, and that fragrant smell returns the moment you open the container.
Making It Your Own
The beauty of this recipe is how forgiving it is once you understand the basic proportions. Some batches of guavas are sweeter than others, and you're welcome to adjust the sugar to suit your taste. I've made it with vanilla bean stirred in near the end, and once added a pinch of ground clove, though the plain version remains my favorite because it lets the fruit be the star.
- For a more rustic texture, skip the food mill and use an immersion blender instead.
- If your paste seems too thick after setting, slice it thinner or warm a piece slightly before serving.
- Keep the parchment paper from unmolding—it makes beautiful wrapping for gifting your paste to friends.
 Save
Save There's something deeply satisfying about making guava paste from scratch, about transforming bright fruit into something you can share long after the season ends. Once you've made it once, you'll find yourself looking for reasons to make it again.
Common Questions
- → How do I know when the guava paste is ready?
The paste is ready when it becomes thick and glossy, holding its shape on a spoon without running off. You'll notice it pulling away from the sides of the pan as you stir. Another test is to drag your spoon through the mixture—it should leave a clean path that doesn't immediately fill back in.
- → Can I use frozen guavas?
Yes, frozen guavas work well for making paste. Thaw them completely before starting, and drain any excess liquid that accumulates during thawing. You may need to adjust the cooking time slightly since frozen fruit can release more water.
- → What's the best way to serve guava paste?
Guava paste pairs beautifully with soft cheeses like cream cheese, goat cheese, or aged varieties like Manchego. Serve it on a charcuterie board with crackers, use it as a filling for pastries and turnovers, or slice thinly and layer on toast with cream cheese for breakfast.
- → Why do I need to strain the guavas?
Straining removes seeds and tough skin fibers, ensuring a smooth, creamy texture. While you can leave some texture if you prefer, removing all solids creates that professional, velvety consistency typical of traditional guava paste. A food mill or fine mesh strainer works best.
- → How long does homemade guava paste last?
Properly stored in an airtight container in the refrigerator, guava paste will keep for up to three months. You can also freeze it for longer storage—wrap portions tightly in plastic wrap and place in a freezer bag for up to six months.
- → Can I reduce the amount of sugar?
Sugar acts as both a sweetener and a preservative, helping the paste set properly. You can reduce it slightly, but the paste may not thicken as much or last as long. For best results, follow the ratio and store any reduced-sugar batches in the freezer.